Friday, March 16, 2012

"Irish Car Bomb" Cupcakes


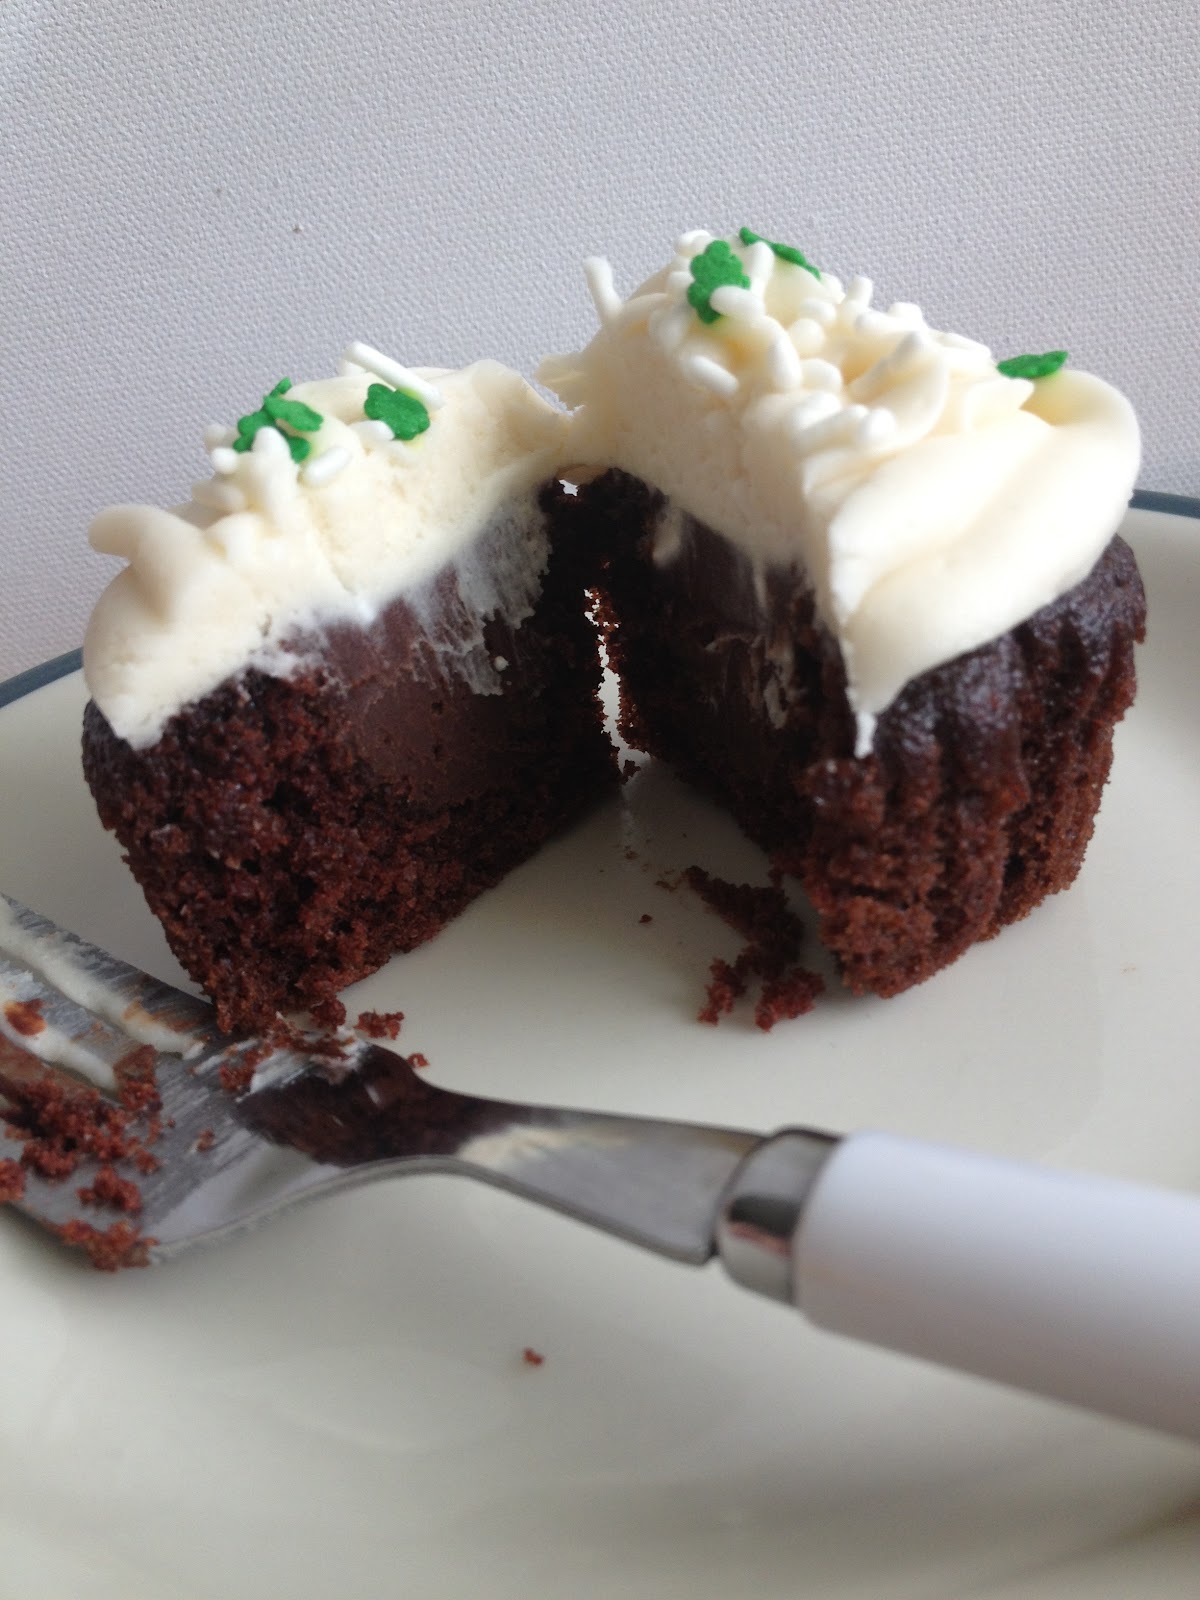
These "Irish Car Bomb" cupcakes are Guinness chocolate stout cupcakes filled with a Jameson whiskey ganache topped with a Bailey's Irish Cream frosting. They were in one word: DELISH! :) I made them last night and brought them to my coworkers and they were definitely a hit. I found these cupcakes online when looking for a tasty treat to bring to work. I was tired of making cake pops for every holiday so I thought I'd do a simple cupcake this time around. But of course, I can never just do something "simple." I found a recipe that included a ganache filling--something that I don't usually do when making cupcakes. I felt a little inspired last night, so I decided to go for it. The original recipe can be found here on I Sing in the Kitchen's blog, I added a couple twists but pretty much followed the recipe for the most part.

I was super excited to make these cupcakes and I was planning on doing a step by step photo tutorial since I had time and wasn't rushed for once. Of course I left my memory card in my work laptop--which was at work. So unfortunately I wasn't able to take hi-res pictures of the steps. I'll still include the pictures I took on my iPhone, but pardon the resolution.


Ingredients

Guinness Stout Chocolate Cupcakes
1 cup Guinness (Feel free to substitute some other type of stout)
1 cup unsalted butter
3/4 cup unsweetened cocoa powder
1/8 cup semi sweet chocolate chips
2 cups flour
2 cups sugar
1 1/2 teaspoons baking soda
3/4 teaspoon salt
2 large eggs
2/3 cup sour cream

Jameson Whiskey Ganache Filling
1 cup semi sweet chocolate chips
2 ounces bittersweet dark chocolate (I used 76% cacao dark chocolate from Trader Joes)
2/3 cup heavy cream
2 tablespoons butter, softened
1 to 2 tablespoons Jameson whiskey (or your favorite Irish whiskey)
1 teaspoon vanilla

Bailey's Irish Cream Frosting
8 oz cream cheese, softened
4oz unsalted butter, softened
5 cups powdered sugar (cut back or add more depending on how much Bailey's you add)
4-6 tablespoons of Bailey’s Irish Cream (I only had the small 50 ml sample bottle of Bailey's on hand so I had to cut back on some of my powdered sugar)


Preparation

Cupcakes
1. Preheat oven to 350°F. Line 2 cupcake tins with liners.
2. Bring 1 cup Guinness and 1 cup butter to a simmer in a saucepan over medium heat. (Use at least a medium sized saucepan as my small one got too hot and overflowed--a mess let me tell you.)
3. Take the mixture off the heat and add the cocoa powder and chocolate chips and whisk until mixture is smooth. Cool slightly.
4. Whisk the flour, sugar, baking soda, and 3/4 teaspoon salt together in large bowl.
5. Using a stand mixer, beat eggs and then add sour cream in another large bowl and mix well.
6. Add Guinness-chocolate mixture to egg mixture and mix in mixer to combine--don't overmix.
7. Add flour mixture and beat briefly on slow speed. Using rubber spatula, fold batter until completely combined.
8. Divide batter among cupcake liners, filling them 2/3 to 3/4 of the way (a tip from the original recipe was to use a two cup measuring cup for this task, it worked beautifully).
9. Bake cake until toothpick inserted into center comes out clean. This took me exactly 17 minutes. Cool cupcakes on a rack completely before coring for filling. (They smell SOOO good coming out of the oven! I almost wanted to stop and just eat them plain... almost. Haha)


Ganache
1. Heat the cream until simmering and then add in the chocolate chips and dark chocolate. Stir rapidly until smooth while on the heat.
2. Add the butter and whiskey and stir until combined.
3. Take the ganache off the heat and let it cool until thick but still soft enough to be piped (I put mine in the fridge, but make sure to stir it every 10 minutes).
3. Meanwhile, use a 1-inch round cookie cutter or an apple corer (the original blogger used a large round piping tip and I did the same, it worked perfectly) to cut the centers out of the cooled cupcakes. You want to go most of the way down the cupcake but not cut through the bottom, so aim for 2/3 of the way. A slim spoon will help you get the center out (I used one of those plastic tools that you use for dipping things into chocolate with and it worked great). Either toss the scraps (gasp) or eat them while you finish up the cupcakes. I decided to make cake balls with the left over cupcake scraps and left over ganache. They were amazing--almost worthy of doing a separate post.


4. Put the ganache into a piping bag with a wide tip and fill the holes in each cupcake to the top. (The piping bag really does work wonders and saves a lot of time. If you don't have a piping bag, I'm sure a plastic freezer bag with one of the corners cut would work fine.) 


Frosting
1. In the bowl of a stand mixer with a paddle attachment or with a hand mixer mix the room temperature cream cheese and butter on low to medium low speed until well incorporated.
2. Slowly add confectioners’ sugar and beat until light and fluffy on medium speed.
3. Drizzle in the Bailey’s, depending on how prominent you want the Irish cream flavoring to be. Mix until completely incorporated.
4. Use a piping bag with tip of your choice (I used Wilton's tip 2D with coupler and disposable piping bag) and frost the cupcakes. Sprinkle with festive sprinkles or decorate to your liking.

OH and if you like the cupcake wrappers, I found them online at the following website and printed them out and wrapped them after frosting and decorating (way less messy if you do it AFTER you frost).

Enjoy!


UPDATE -- Here are some pictures of the inside of the cupcake. :)


Tuesday, March 13, 2012

Pineapple Fried Rice Style Quinoa with Sweet Chili Stir Fry Chicken


I made this weeks ago but it's been so busy at work that I've been working a lot of overtime and haven't had time to blog unfortunately. (I haven't even had time to cook actually!) I made this quinoa as an experiment and the chicken followed. I love quinoa and I have been experimenting with it as a substitution for rice. I decided to try making quinoa fried rice style. It was AMAZING. Let me just tell you, it exceeded all of my expectations. I thought it tasted BETTER than some of the normal fried rice I've had at restaurants even. My co-workers loved it as well--it passed the taste test! Haha. You could potentially make the fried rice quinoa with or without the pineapple. I just LOVE pineapple, so I threw it in there.
DISCLAIMER: Sorry for the low quality photos, I really thought this was going to be a failed attempt at something great so I didn't bother with taking a bunch of photos. Next time! :)


Pineapple Fried Rice Style Quinoa

Ingredients
1 cup dry, rinsed quinoa
2 cups water
1 egg
1/4 cup and 2 tbsp grapeseed oil (separated) or 1/2 stick of butter
6 tbsp soy sauce
1/2 cup chopped cashews (optional)
1 and 1/8 cup yellow onion, finely chopped -- separated into 1 cup and 1/8 cup (I basically chopped up one entire yellow onion and used 1/2 for the quinoa and 1/2 for the chicken)
1 tbsp minced garlic
1 cup chopped baby carrots
2/3 cup peas


Sweet Chili Stir Fry Chicken


Ingredients
2 chicken breasts
1 cup finely chopped yellow onion
2 tbsp minced garlic
2 tbsp grapeseed oil
1/3 cup sweet chili sauce (I got mine at the grocery store but it looks like this: Sweet Chili Sauce - 25 oz)
Pineapple Chunks to taste (I used a whole can of pineapple chunks in water for the rice and chicken)
Salt & Pepper

Preparation

Quinoa
1. Cook quinoa using the method on the back of your package or use a rice steamer like I do. Along with the water and the quinoa, add in about 1/8 cup of chopped onion as well.
2. While the quinoa is cooking (usually takes about 20 minutes) stir fry the yellow onion, carrots and peas in the 2 tbsp of grapeseed oil and garlic.
3. Once the onions look fairly translucent, add in the pineapple. Heat for another 3 minutes or so and then take off the heat.
4. When the quinoa is completely cooked, melt the 1/2 stick of butter in a large skillet (may be substituted for grapeseed or olive oil as mentioned in the ingredients).
5. Put the cooked quinoa into the skillet along with the butter or grapeseed oil and "fry" the quinoa, stirring rapidly as to not burn. (I typically use medium heat.)
6. Once the quinoa is fully coated, add in the stir fried veggies, soy sauce, and chopped cashews and mix thoroughly.
7. In the pan you had the veggies, use the left over oil to fry and scramble up one egg.
8. Once the scrambled egg is cooked, chop it up (using the spatula) and add it to the fried quinoa. Mix thoroughly.

Chicken
While you're frying up the veggies on one burner, start the chicken on another burner.
1. Cube the 2 chicken breasts into 1 inch pieces.
2. Add the grapeseed oil to the pan and saute the onion and minced garlic.
3. Once the onion looks translucent add in the cubed chicken.
4. Stir fry the chicken for a good 5-10 minutes until the chicken looks white. At this point add in the sweet chili sauce and pineapple.
5. Continue to cook the chicken for another 10 minutes on low-medium, stirring occasionally. (I covered my chicken with a lid and let it simmer while I finished up the quinoa.)


Mexican Hot Chocolate Cake Pops


So if you want a tutorial on cake pops see my Holiday Cake Pops post from a while back. I just wanted to share some pictures from the cake pops that me and my co-worker, Rae Ann, and her son (who is in the 3rd grade) made for Valentine's Day. We created a bomb new flavor combo that we deemed Mexican Hot Chocolate. It was basically chocolate fudge cake mix with ground up Abuelita's Mexican Chocolate and cinnamon. The frosting that we mixed with the cake was chocolate fudge with more ground up Abuelita's Mexican Chocolate. These were AMAZING! :) Since we were making some for our co-workers and her son's 3rd grade class we made 2 types of cake pops. The second flavor was red velvet (of course) for Valentine's Day. (You can see my holiday cake pops post for the exact ingredients we used.)


Monday, February 20, 2012

Turtle Cookies


 Boy turtle cookies


Girl turtle cookies


I saw these cookies on Pinterest about 4 months ago and pinned them because I knew I wanted to make them for my mom's birthday. My mom is kind of obsessed with turtles. She thinks they are "soooo cute." She has a lot of turtle figurines and I had made her a ceramic turtle from Petroglyph a couple of birthdays ago. She has pendants and jewelery... and even has a Boudin bread turtle that she has kept as "decoration" in the kitchen. So when I saw these on Pinterest, I knew I had to make them. February came around and I got to try them out for my mom's family birthday celebration. The original tutorial and recipe can be found here on Diamonds for Dessert's blog. Her tutorial is so accurate and easy to follow that I am not going to bother replicating the images.

"Icebox" Cookie Dough (adapted from Diamonds for Dessert's blog)


2 1/2 cups flour
2 sticks butter, softened
3/4 cup sugar
1/2 cup powdered sugar
2 egg yolks
2 tsp vanilla extract
1/2 tsp Wilson's "Moss" green gel coloring (if you are going for all natural ingredients, use 2 tsp matcha powder as the original recipe calls for)  
1/2 cup semi sweet chocolate chips
1/8 cup red melting chocolates (optional)

Preparation

1. Cream the butter and the two sugars together.
2. Mix in the egg yolks one at a time and then, mix in the vanilla.

[STOP here to separate the mixture into separate bowls.]

3. Split the mixture that you have so far in thirds and set aside for now.
4. In one bowl, add 3/4 cup + 2 tbsp flour and 1/2 tsp green gel coloring (or the matcha powder). Add one third of the previously split mixture and mix until you get a dough. Mix thoroughly.
5. To the other bowl, add 1 1/2 cups flour. Add the remaining two thirds of the previously split mixture and mix. Now you should have one green cookie dough and one vanilla cookie dough.
6. Split the vanilla dough in half. Place half of the vanilla dough on a piece of plastic wrap. Roll it so it forms a log with a 1 1/4" diameter.
7. Sandwich the green dough between two sheets of plastic wrap. Use a rolling pin to roll it out to a rectangle as long as the vanilla log and wide enough to fully wrap around it (it'll be about 1/4" thick).
8. Wrap the green dough around the vanilla dough log. Use your fingers to smooth out the crease formed.
9. Cover the entire log in plastic wrap and refrigerate for 15 minutes.
10. Once the dough is firm, remove from the refrigerator. Slice 1/4" thick slices from the dough log and place the cookies onto the baking sheets.
11. Take the other half of the vanilla dough, sandwich it between plastic wrap, and roll it out to 1" thick.
12. Use a round 1" cookie cutter to cut out circles from the dough. Take the cookie cutter and cut off part of the circle to form crescent shapes for the turtle heads. (I had to get creative here and use a heart shaped cookie cutter and knife to cut off the rounded parts of the heart for the heads)
13. Use a big straw (like the ones for pearl milk tea) to cut out small circles. Use a knife to cut each circle in half. (I again had to get creative and had to use a small flower cookie cutter and knife to cut semi circles)
14. Now take 1 log slice, 1 crescent, and 5 small semicircles (4 for the feet and 1 for the tail) and stick them together to form a turtle.
15. Preheat oven to 325°F.
16. Line two baking sheets with parchment paper.
17. Add all the semi circles to the base cookie log slices. Pinch the tail semicircles so it looks triangular. Add two black sprinkles on the crescent for the eyes. Repeat for the other log slices.
18. Chill cookie turtles for 10 minutes.
19. Place in the oven to bake for 12-15 minutes.
20. Let cool on the baking sheets for 3 minutes, then move the cookies to a cooling rack to finish cooling.

Decorating

1. Melt the chocolate. Place it in a piping bag. (I cheat and stick the chocolate directly into a freezer bag and then once melted, cut a small slit in one of the corners in order to pipe the chocolate.
2. Pipe two vertical lines on the shell. Then, pipe two horizontal lines on the shell perpendicular to the vertical lines.
(Optional) 3. Melt red melting chocolates and make two triangles near the head of the turtle to form a "bow." This makes girl turtles.


 Enjoy!

Sunday, February 19, 2012

Superbowl Party 2012

These are pictures from my first Superbowl party hosted at my apartment. I had lots of fun prepping for the game. We had TONS of food--sliders, bacon wrapped hot dogs, all the food below and all the food people brought. See all the food below. :)


Chocolate Dipped Pretzels (in NE Patriots and NY Giants colors)


 Football Peanut Butter Chocolate Brownies


 "Matilda Cake" -- chocolate cake with chocolate frosting and chocolate ganache


The whole dessert table setup.


Grandma's Chili Beans with Chorizo


Bloody Mary Bar with the Infused Vodkas


 Mimosas


Utensils setup


Tuesday, February 7, 2012

Vodka Gummy Bears


We just had our first Superbowl party this past weekend and it was lots of fun! We had WAY too much food as to be expected, but at least I know no one went hungry. I don't think I'll be able to do a post for every single item that we made for the party but the vodka gummy bears we made were a hit to say the least! They are super simple to make and only require some planning ahead of time. They aren't harsh and are actually really sweet and of course fun to eat. There are a ton of tutorials out there on how to make vodka gummy bears so I will just give you some ingredients, step by step instructions and pictures of the results. (See a Youtube tutorial here.)


Ingredients
- 2-3 lbs of Haribo gummy bears (Yes, the brand is important. These gummy bears tend to keep their shape and do not disintegrate as easily as other brands. The amount of gummies will depend on how much you want to make. Buy them cheap on Amazon -- Haribo Gummi Candy Gold-Bears, 5-Pound Bag)
- 1 bottle of Smirnoff Fluffed Marshmallow vodka
- 3 cups of Stoli Vodka (over the 4 day period)
- 1 can of frozen lime juice concentrate


Tools
- large holding container with lid
- strainer
- long spoon

Preparation 


1. Add gummy bears to your large holding container. (I put mine in a handful at a time to make sure none of the bears are stuck together.)


2. Fill up container with the entire bottle of Smirnoff Fluffed Marshmallow vodka (the gummy bears should be completely covered).
3. Close the container and put in the refrigerator.
4. After 24 hours take the container out and stir the gummy bears around. You will see that they have absorbed much of the alcohol.
5. Add more vodka so that the gummy bears are completely submerged in vodka. (I used regular Stoli because I didn't have any more of the Smirnoff Fluffed vodka)
6. Repeat this process daily for a total of at least 4 days.
7. On the night before when you want to serve these gummies, instead of adding vodka to the gummies, add the entire can of frozen lime juice. Stir well and mix thoroughly.
8. Put in the refrigerator once again overnight.
9. Right before serving, take the gummy bears out and strain the excess liquid. (Save the liquid in a cup or bowl--it's delicious and can be drank!)
10. Serve the gummy bears in small shot glass plastic containers.


Enjoy!
 

See Dani Bake. Copyright © 2011 -- Template created by O Pregador -- Powered by Blogger