Showing posts with label seedanibake. Show all posts

Thursday, April 16, 2015

Overnight Steel Cut Oats


**First of all, I apologize for the terrible lighting for all of these pictures. It was at night, so no natural light for me! **

After scouring the internet for a fool proof recipe for overnight steel cut oats, I decided that I needed to post about my journey. I had to take a combination of different recipes and make my own method that resulted in the right texture of oats that me and my husband agreed on. (Although he honestly didn't mind a super chewy -- almost crunchy-- texture... I couldn't get past it.)

You could eat these cold right out of the fridge or your could heat them up like we do in the morning. Just zap them in the microwave for 1 minute. Really -- that's it! Just one minute and they are piping hot and deliciously creamy.


The best part is that the possibilities are endless! You can add whatever you'd like to switch up the flavors. Add some apple sauce and sliced almonds. Or add coconut flakes and crushed pecans. If you're being "bad" add a couple chocolate chips for a sweet addition. 


I personally use unsweetened almond milk because I watching my calories and carb intake. But you could use half and half or milk as well. This is the reason you also won't find any added sugar (or artificial sweetener) in my recipe. By all means go ahead and add it if you must, but honestly with the PB and fruit you don't need it.


Ingredients:

1/4 cup dry steel cut oats
1/4 cup + 2 tbsp (or 3/8 cup) unsweetened almond milk
1 tbsp peanut butter
1 tsp cinnamon
1 tsp vanilla
1/4 cup berries, sliced bananas, apple sauce, whatever you'd like

Half pint mason jars and lids


Preparation:

Place 1/4 cup of dry steel cut oats in one of your mason jars.
Add 1/4 cup almond milk to the oats, mix together and stick in the microwave for 1 minute.
The glass will be hot, so place it on a towel or napkin instead of directly on a cold counter. 
Add the vanilla and the cinnamon, mix together.


Add the tablespoon of peanut butter and an extra 2 table spoons of almond milk to loosen up the oats and mix together.
Wash and slice the berries or fruit you're using and add to the jars.
Mix the fruit into the oats so they are fully immersed.
Put the lids on the jar and leave on the counter until the jars are completely cool. (If you are doing a large batch, they will most likely be cool by the time you finish up adding the other ingredients.)
Stick the jars in the fridge until you are ready to eat (at least overnight). 
When you are ready to eat, take off the lid, stir up a bit and stick in the microwave for 1 minute OR eat cold. I personally like them heated up. They are warm, filling and comforting.


Enjoy!


Thursday, May 17, 2012

Banana Chocolate Chip Cupcakes for Easter


Okay, okay, so I know banana chocolate chip cupcakes don't exactly scream "spring" or "Easter," but I had tons of bananas and when I made these a couple months ago they were a big hit with the fam bam. I originally found a recipe that inspired me on epicurious (the original recipe called for a peanut butter frosting--which could also be amazing). The first time I made them I didn't use green food coloring in the frosting and I sprinkled crushed Nilla wafers on top. This time for Easter, I decorated the cupcakes to look like grass with Easter eggs on top using Hershey's candy coated miniature eggs.


Banana Chocolate Chip Cupcakes with Cinnamon Cream Cheese Frosting
Yields: 12 - 16 cupcakes

Ingredients

Cupcakes
1 1/4 cups all purpose flour
1 1/2 teaspoons baking powder
1/2 teaspoon baking soda
1/4 teaspoon salt
2 very ripe large bananas, peeled
1 cup of semi-sweet chocolate chips (more if you're a chocolate fanatic like me)
1/2 cup sour cream
1 1/2 teaspoons vanilla extract
1/2 teaspoon cinnamon
1/2 teaspoon pumpkin pie spice (or all spice)
3/4 cup sugar
1/2 cup (1 stick) unsalted butter, room temperature
1 large egg
1 large egg yolk

Cinnamon Cream Cheese Frosting
3 cups powdered sugar
1 8-oz package cream cheese, room temperature
1/4 cup (1/2 stick) unsalted butter, room temperature
1 tsp vanilla extract
1 tsp cinnamon (or more to taste)
Green food coloring drops (to preference)
Hershey's Easter Candy Coated Milk Chocolate Eggs (3 per cupcake)

Preparation

Cupcakes
1. Position rack in center of oven and preheat to 350°F. 
2. Line a muffin tin with paper liners and set aside.
3. Whisk flour, baking powder, cinnamon, pumpkin pie spice, baking soda, and salt in medium bowl to blend. 
4. Mash bananas with fork in another medium bowl until smooth. 
5. Mix sour cream and vanilla into bananas.
6. Using stand mixer (or electric mixer), beat sugar and butter in large bowl until light and fluffy. This took me about 2-3 minutes.
7. Add one whole egg and the egg yolk of the second and beat until well blended. 
8. Add flour mixture in 3 additions alternately with banana-sour cream mixture in 2 additions, beginning and ending with flour mixture and beating just until blended after each addition. (I'm not sure if this really makes a difference or not, but I did this and it made my cupcakes come out light and fluffy--not like when you overmix a batter.)
9. Add in chocolate chips, fold into batter until well distributed.
10. Divide batter among prepared muffin tin -- with about 1/4 cup each.
11. Bake cupcakes until tester inserted into center of each comes out clean, about 20 minutes. (Mine took exactly 20 minutes)
12. Transfer cupcakes to a wire rack and let cool completely before frosting.


Cinnamon Cream Cheese Frosting
1. Sift powdered sugar into large bowl. 
2. Add cream cheese and butter.
3. Add cinnamon and vanilla.
3. Using stand mixer (or electric mixer), beat until smooth.
4. Add green food coloring and mix until well blended. (Do not overmix)
5. Pipe frosting onto cupcakes. (I was at my grandmother's house and didn't have my piping bags and tips so I simply used a plastic baggy and cut off one of the bottom corners to use as my piping bag. But you could get really fancy and use the Wilton's grass tip --  Wilton Multi-Opening #233 Decorating Tip)
6. Place 3 candy eggs in the center of the cupcake.


Enjoy!


Monday, April 9, 2012

First Award -- Liebster Award!


YAY! How awesome! Thanks Kavita from What's Cooking @ Kavita's Kitchen? for the Liebster Blog award. Apparently, liebster is a German word meaning favorite, dearest or beloved. The award is awarded to up-and-coming blogs with less than 200 followers. It's definitely an honor to be chosen and I'm glad there are people who enjoy my pictures and recipes as much as I love them! :)

I'd now like to keep the love going and share this award with 5 other bloggers who all have a wonderful blog worth checking out.

Here are the 5 I have chosen (in no particular order):
  1. Erin - Lemon-Sugar 
  2. Edwina - My Mezzaluna
  3. Amalia - C2 Cookie Construction
  4. Holly - Happy Food. Healthy Life.
  5. Heather - A Sage Amalgam
If you accept the award:
Copy and paste the award on your blog. Link back the blogger who gave you the award.
Pick your favorite 5 bloggers with less than 200 followers who deserve to be noticed and leave a comment on their blog to let them know that they have received the award.
Hope that the 5 blogs chosen will keep spreading the love and pass it on to 5 more blogs.

Friday, March 16, 2012

"Irish Car Bomb" Cupcakes


These "Irish Car Bomb" cupcakes are Guinness chocolate stout cupcakes filled with a Jameson whiskey ganache topped with a Bailey's Irish Cream frosting. They were in one word: DELISH! :) I made them last night and brought them to my coworkers and they were definitely a hit. I found these cupcakes online when looking for a tasty treat to bring to work. I was tired of making cake pops for every holiday so I thought I'd do a simple cupcake this time around. But of course, I can never just do something "simple." I found a recipe that included a ganache filling--something that I don't usually do when making cupcakes. I felt a little inspired last night, so I decided to go for it. The original recipe can be found here on I Sing in the Kitchen's blog, I added a couple twists but pretty much followed the recipe for the most part.

I was super excited to make these cupcakes and I was planning on doing a step by step photo tutorial since I had time and wasn't rushed for once. Of course I left my memory card in my work laptop--which was at work. So unfortunately I wasn't able to take hi-res pictures of the steps. I'll still include the pictures I took on my iPhone, but pardon the resolution.


Ingredients

Guinness Stout Chocolate Cupcakes
1 cup Guinness (Feel free to substitute some other type of stout)
1 cup unsalted butter
3/4 cup unsweetened cocoa powder
1/8 cup semi sweet chocolate chips
2 cups flour
2 cups sugar
1 1/2 teaspoons baking soda
3/4 teaspoon salt
2 large eggs
2/3 cup sour cream

Jameson Whiskey Ganache Filling
1 cup semi sweet chocolate chips
2 ounces bittersweet dark chocolate (I used 76% cacao dark chocolate from Trader Joes)
2/3 cup heavy cream
2 tablespoons butter, softened
1 to 2 tablespoons Jameson whiskey (or your favorite Irish whiskey)
1 teaspoon vanilla

Bailey's Irish Cream Frosting
8 oz cream cheese, softened
4oz unsalted butter, softened
5 cups powdered sugar (cut back or add more depending on how much Bailey's you add)
4-6 tablespoons of Bailey’s Irish Cream (I only had the small 50 ml sample bottle of Bailey's on hand so I had to cut back on some of my powdered sugar)


Preparation

Cupcakes
1. Preheat oven to 350°F. Line 2 cupcake tins with liners.
2. Bring 1 cup Guinness and 1 cup butter to a simmer in a saucepan over medium heat. (Use at least a medium sized saucepan as my small one got too hot and overflowed--a mess let me tell you.)
3. Take the mixture off the heat and add the cocoa powder and chocolate chips and whisk until mixture is smooth. Cool slightly.
4. Whisk the flour, sugar, baking soda, and 3/4 teaspoon salt together in large bowl.
5. Using a stand mixer, beat eggs and then add sour cream in another large bowl and mix well.
6. Add Guinness-chocolate mixture to egg mixture and mix in mixer to combine--don't overmix.
7. Add flour mixture and beat briefly on slow speed. Using rubber spatula, fold batter until completely combined.
8. Divide batter among cupcake liners, filling them 2/3 to 3/4 of the way (a tip from the original recipe was to use a two cup measuring cup for this task, it worked beautifully).
9. Bake cake until toothpick inserted into center comes out clean. This took me exactly 17 minutes. Cool cupcakes on a rack completely before coring for filling. (They smell SOOO good coming out of the oven! I almost wanted to stop and just eat them plain... almost. Haha)


Ganache
1. Heat the cream until simmering and then add in the chocolate chips and dark chocolate. Stir rapidly until smooth while on the heat.
2. Add the butter and whiskey and stir until combined.
3. Take the ganache off the heat and let it cool until thick but still soft enough to be piped (I put mine in the fridge, but make sure to stir it every 10 minutes).
3. Meanwhile, use a 1-inch round cookie cutter or an apple corer (the original blogger used a large round piping tip and I did the same, it worked perfectly) to cut the centers out of the cooled cupcakes. You want to go most of the way down the cupcake but not cut through the bottom, so aim for 2/3 of the way. A slim spoon will help you get the center out (I used one of those plastic tools that you use for dipping things into chocolate with and it worked great). Either toss the scraps (gasp) or eat them while you finish up the cupcakes. I decided to make cake balls with the left over cupcake scraps and left over ganache. They were amazing--almost worthy of doing a separate post.


4. Put the ganache into a piping bag with a wide tip and fill the holes in each cupcake to the top. (The piping bag really does work wonders and saves a lot of time. If you don't have a piping bag, I'm sure a plastic freezer bag with one of the corners cut would work fine.) 


Frosting
1. In the bowl of a stand mixer with a paddle attachment or with a hand mixer mix the room temperature cream cheese and butter on low to medium low speed until well incorporated.
2. Slowly add confectioners’ sugar and beat until light and fluffy on medium speed.
3. Drizzle in the Bailey’s, depending on how prominent you want the Irish cream flavoring to be. Mix until completely incorporated.
4. Use a piping bag with tip of your choice (I used Wilton's tip 2D with coupler and disposable piping bag) and frost the cupcakes. Sprinkle with festive sprinkles or decorate to your liking.

OH and if you like the cupcake wrappers, I found them online at the following website and printed them out and wrapped them after frosting and decorating (way less messy if you do it AFTER you frost).

Enjoy!


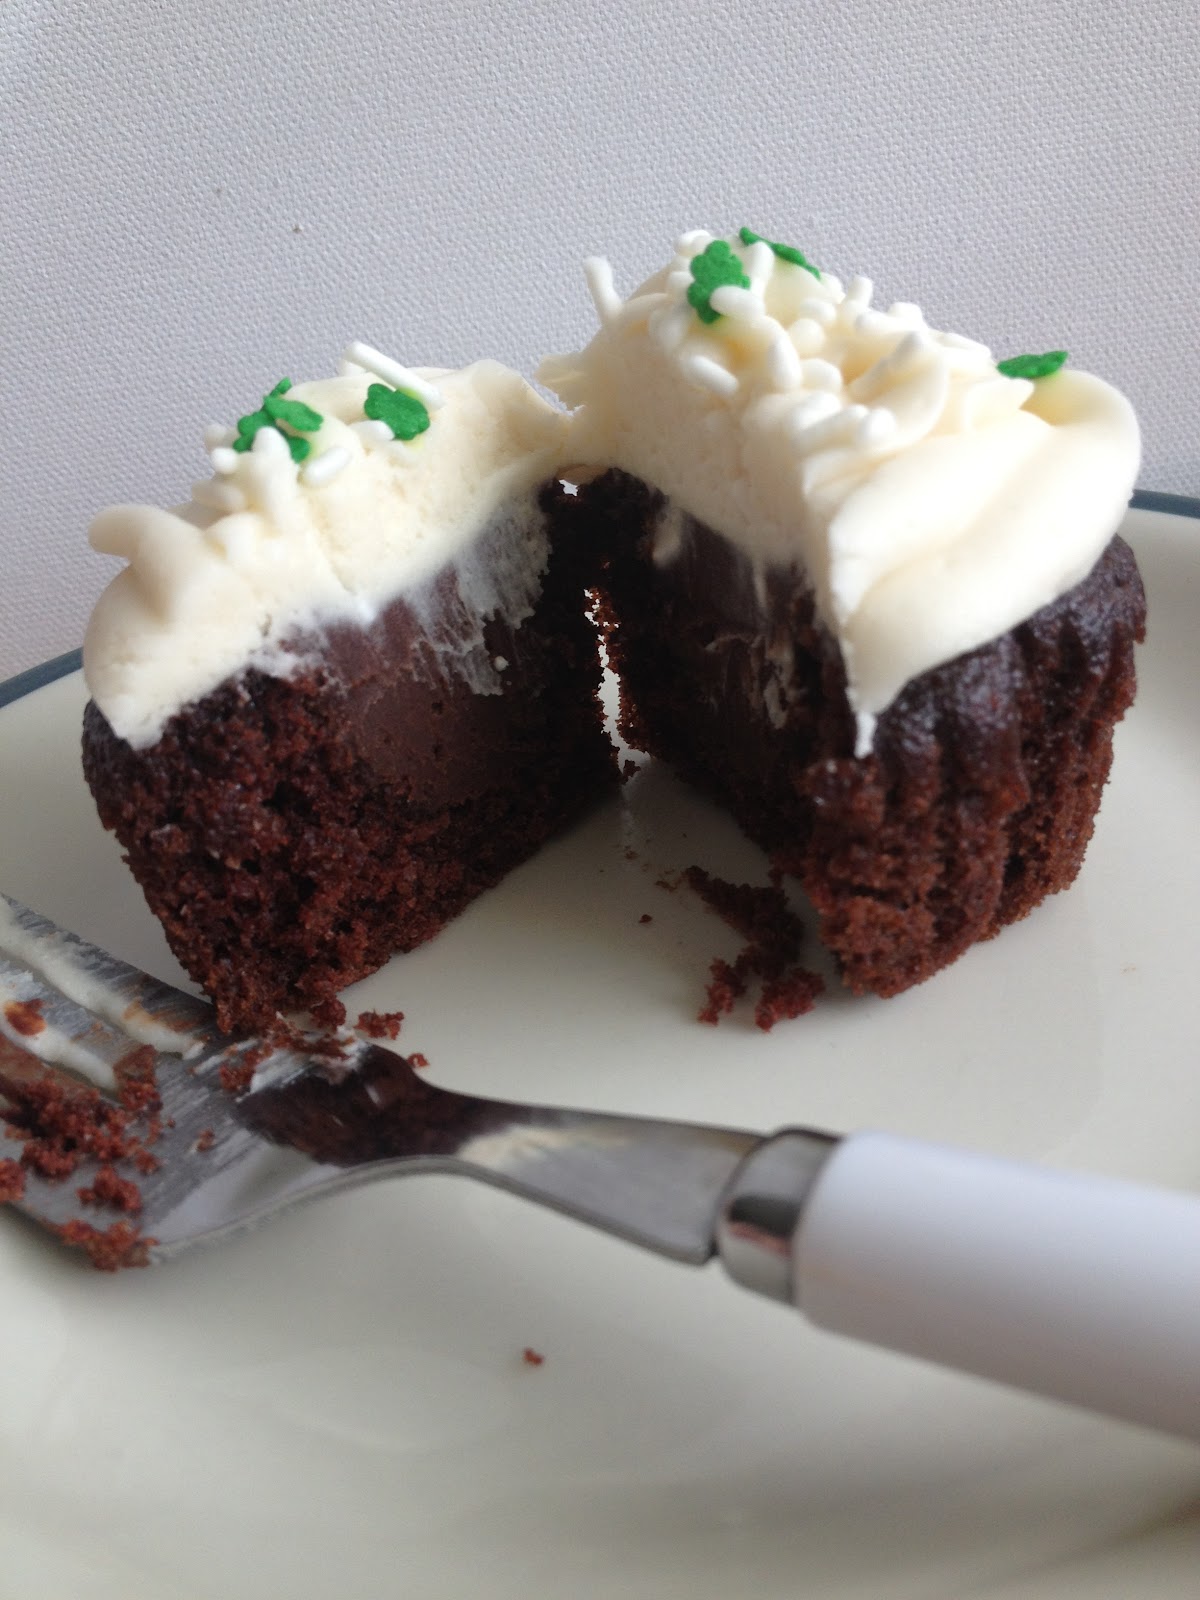
UPDATE -- Here are some pictures of the inside of the cupcake. :)


Monday, February 20, 2012

Turtle Cookies


 Boy turtle cookies


Girl turtle cookies


I saw these cookies on Pinterest about 4 months ago and pinned them because I knew I wanted to make them for my mom's birthday. My mom is kind of obsessed with turtles. She thinks they are "soooo cute." She has a lot of turtle figurines and I had made her a ceramic turtle from Petroglyph a couple of birthdays ago. She has pendants and jewelery... and even has a Boudin bread turtle that she has kept as "decoration" in the kitchen. So when I saw these on Pinterest, I knew I had to make them. February came around and I got to try them out for my mom's family birthday celebration. The original tutorial and recipe can be found here on Diamonds for Dessert's blog. Her tutorial is so accurate and easy to follow that I am not going to bother replicating the images.

"Icebox" Cookie Dough (adapted from Diamonds for Dessert's blog)


2 1/2 cups flour
2 sticks butter, softened
3/4 cup sugar
1/2 cup powdered sugar
2 egg yolks
2 tsp vanilla extract
1/2 tsp Wilson's "Moss" green gel coloring (if you are going for all natural ingredients, use 2 tsp matcha powder as the original recipe calls for)  
1/2 cup semi sweet chocolate chips
1/8 cup red melting chocolates (optional)

Preparation

1. Cream the butter and the two sugars together.
2. Mix in the egg yolks one at a time and then, mix in the vanilla.

[STOP here to separate the mixture into separate bowls.]

3. Split the mixture that you have so far in thirds and set aside for now.
4. In one bowl, add 3/4 cup + 2 tbsp flour and 1/2 tsp green gel coloring (or the matcha powder). Add one third of the previously split mixture and mix until you get a dough. Mix thoroughly.
5. To the other bowl, add 1 1/2 cups flour. Add the remaining two thirds of the previously split mixture and mix. Now you should have one green cookie dough and one vanilla cookie dough.
6. Split the vanilla dough in half. Place half of the vanilla dough on a piece of plastic wrap. Roll it so it forms a log with a 1 1/4" diameter.
7. Sandwich the green dough between two sheets of plastic wrap. Use a rolling pin to roll it out to a rectangle as long as the vanilla log and wide enough to fully wrap around it (it'll be about 1/4" thick).
8. Wrap the green dough around the vanilla dough log. Use your fingers to smooth out the crease formed.
9. Cover the entire log in plastic wrap and refrigerate for 15 minutes.
10. Once the dough is firm, remove from the refrigerator. Slice 1/4" thick slices from the dough log and place the cookies onto the baking sheets.
11. Take the other half of the vanilla dough, sandwich it between plastic wrap, and roll it out to 1" thick.
12. Use a round 1" cookie cutter to cut out circles from the dough. Take the cookie cutter and cut off part of the circle to form crescent shapes for the turtle heads. (I had to get creative here and use a heart shaped cookie cutter and knife to cut off the rounded parts of the heart for the heads)
13. Use a big straw (like the ones for pearl milk tea) to cut out small circles. Use a knife to cut each circle in half. (I again had to get creative and had to use a small flower cookie cutter and knife to cut semi circles)
14. Now take 1 log slice, 1 crescent, and 5 small semicircles (4 for the feet and 1 for the tail) and stick them together to form a turtle.
15. Preheat oven to 325°F.
16. Line two baking sheets with parchment paper.
17. Add all the semi circles to the base cookie log slices. Pinch the tail semicircles so it looks triangular. Add two black sprinkles on the crescent for the eyes. Repeat for the other log slices.
18. Chill cookie turtles for 10 minutes.
19. Place in the oven to bake for 12-15 minutes.
20. Let cool on the baking sheets for 3 minutes, then move the cookies to a cooling rack to finish cooling.

Decorating

1. Melt the chocolate. Place it in a piping bag. (I cheat and stick the chocolate directly into a freezer bag and then once melted, cut a small slit in one of the corners in order to pipe the chocolate.
2. Pipe two vertical lines on the shell. Then, pipe two horizontal lines on the shell perpendicular to the vertical lines.
(Optional) 3. Melt red melting chocolates and make two triangles near the head of the turtle to form a "bow." This makes girl turtles.


 Enjoy!

Friday, January 27, 2012

Chocolate Raspberry Brownies with Fresh Raspberry Mousse


I was hanging out with my mom (Hi mom!) and I told her I wanted to bake something with her so I could feature her as a guest chef. :) So we were thinking of something to bake and she mentioned she had a lot of raspberries. I LOVE dark chocolate raspberry truffles from See's Candies--to die for--so I figured we could do something with raspberries and dark chocolate. We both aren't big cupcake or cake fans so we decided to go with brownies. We did a Google search and found this recipe which we slightly adapted to fit our ingredients on hand. We made a couple heart shaped brownies as well as some in a 8x8 pan to be cut into squares. We were at my mom's house so we used her heart shaped pans, not sure where she got them from. I have 4 of the Wilton 4-Inch Heart Springform Pans back at my house that I've used for a similar recipe in the past. I took this pan of brownies to the office and they loved them. :) I personally think that next time I will make the brownies more chocolatey--because let's face it, who can have TOO much chocolate??


Ingredients

Chocolate Raspberry Brownies

- 1 cup chocolate chips or chunks (we used Ghiradelli dark chocolate (60% cocoa) chunks but you could use semi-sweet chocolate chips or chunks as well, just depends on your chocolate preference)
- 1 1/4 cups all-purposeflour
- 1/2 teaspoonbaking powder
- 1/2 teaspoon salt
- 1 cup granulatedsugar
- 1/3 cup (2/3stick) butter, softened (since this was short notice, we had to cheat and use the microwave to soften the butter--just don't melt it completely.)
- 1 teaspoon vanillaextract
- 2 large eggs
- 1/3 cup freshraspberries, mashed (I prepped the raspberries ahead of time and ended up having to drain some of the juice before I added them to the mixture.)

Raspberry Mousse

- 1 pkg. (8 oz.) cream cheese, softened
- 3/4 cup powderedsugar
- 3/4 cup mini chocolate chips or chopped chocolate chunks (we happened to have semi-sweet mini chocolate chips on hand, or else we could have chopped up the chunks we used for the brownie mix)
- 1/2 teaspoonvanilla extract
- 1/4 cup freshraspberries, mashed, drained
- 1/3 cup heavy whippingcream


Preparation 

Chocolate Raspberry Brownies 

1) Preheat oven to 350º F. Grease your baking pans very well. (The entire batter will fit in a 9 inch square pan, or you could split it up into 4 heart shaped pans and an 8x8 pan like me and my mom decided to do. It's important to make sure your pans are well greased so you do not have trouble getting the brownies out.)
Mom says: "We lined our 8x8 pan with foil so it would be easier to remove from the pan and cut into squares. Just make sure to grease your foil really well."

2) Rinse and drain your fresh raspberries.


3) Mash the raspberries using a potato masher or something similar.


4) Microwave 1 cup chunks in small, uncovered, microwave-safebowl on high (100%) power for 30 seconds. Stir. Microwave at additional 10- to 15-secondintervals, stir until smooth; cool to room temperature. 
Mom says: "You have to heat it in no more than 30 second intervals and stir in between to melt the chocolate without overcooking it. It'll get grainy if you overcook it."


5. Combine flour, baking powder and salt in small bowl.

6. Beatgranulated sugar, butter and vanilla extract with your stand mixer or a hand mixer in a medium mixing bowl until creamy.Add the eggs. Beat the mixture until light and fluffy.

Mom says: "Break the eggs in a separate bowl just in case you happen to get a bad egg so you won't mess up your entire batter."
 

7. Next beat in melted chocolate. (Depending on how fast you are at getting your ingredients together you might have to stick it in the microwave again for 10 seconds to make sure it is still melted.)

8. Stir in flourmixture little by little until blended.


9. Stir in mashed raspberries. (I drained the mashed raspberries at this time since some of the juice was collecting.)


10. Spread into prepared bakingpan. (I used a rubber spatula and the back of a spoon to spread the batter as it is too thick and sticky to just pour. This was probably the most difficult part of the whole process.)


11. Bake for 25 to 30 minutes or until wooden pick inserted incenter comes out slightly sticky. Cool completely in pan on wire rack. (Since we used the heart pans as well as the 8x8 we only baked for about 15 minutes and they were completely baked. And honestly we were too eager to eat these bad boys that we didn't let them cool completely before putting on the mousse. We put them on wire racks for like 15 minutes to cool.)


Raspberry Mousse

1. Beat whipping cream in stand mixer or with hand mixer in a small mixing bowl until stiff peaks form. Transfer whipped cream to another clean bowl and set aside.


 <-- my mom whipping the cream :)


2. Beatcream cheese, powdered sugar, vanilla extract in stand mixer (we didn't bother to wash after whipping the cream) or using the hand mixer in a separate mixing bowl until creamy. 


3. Fold in mashed raspberries and choppedchocolate morsels.


4. Fold whipped creaminto raspberry cream cheese mixture until blended. 


5. Spread mousse over cooledbrownie and garnish with fresh raspberries. 


6. Refrigerate for 1 hour.  (We again were not patient and only refrigerated the small heart pans for about 15 minutes again before we plated the brownies for pictures. But the 8x8 pan stayed in overnight.)


7. Run a sharp knife around the edges of the heart pans and pop out. (If using a 9 inch pan without foil lining, repeat this process. If lined with foil, no need to run a knife around the edges, simply pull the foil out of the pan and fold it down in order to cut the brownies into bars.)

Enjoy!!


Me and my mommy. :)


Mom says: "You better make sure I look good in the picture! They already know what you look like!"
 

See Dani Bake. Copyright © 2011 -- Template created by O Pregador -- Powered by Blogger